

Sweet Poppy Swirly Tree
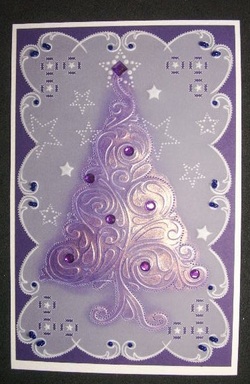
Sweet Poppy Stencil - Swirl Tree Parchment Craft Card.
I love using these stencils to use with parchment craft techniques.
I have also coloured the parchment with blendable pencils and add gilding wax on the front to achieve a metallic effect.
I love using these stencils to use with parchment craft techniques.
I have also coloured the parchment with blendable pencils and add gilding wax on the front to achieve a metallic effect.
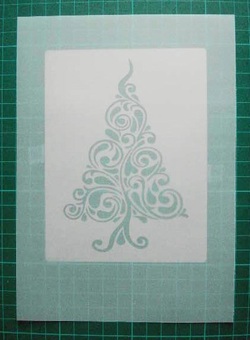
First attach your parchment paper over the stencil with a low tack tape.
Place onto an embossing mat keeping the stencil under the parchment.
Using a 1mm ball tool and emboss the parchment by gently pushing it through the stencil, staying close to the outer edges of the sections in the swirl tree.
See the picture below to see what it should look like when its finished.
Place onto an embossing mat keeping the stencil under the parchment.
Using a 1mm ball tool and emboss the parchment by gently pushing it through the stencil, staying close to the outer edges of the sections in the swirl tree.
See the picture below to see what it should look like when its finished.
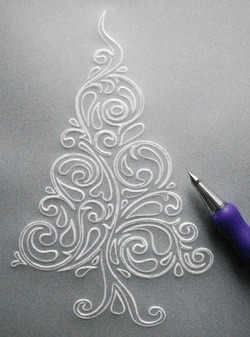
The swirly tree completed embossing.
You can see how I have only embossed the edges of the shapes.
You can see how I have only embossed the edges of the shapes.
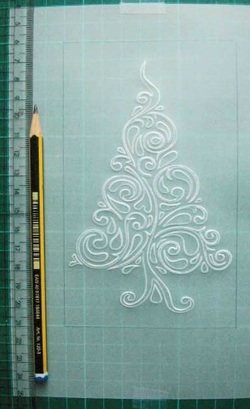
Place your tree onto a grid mat.
Draw a line around the tree using a ruler and graphite pencil following the lines on the grid mat below, try and leave an equal distance on all sides.
Draw a line around the tree using a ruler and graphite pencil following the lines on the grid mat below, try and leave an equal distance on all sides.
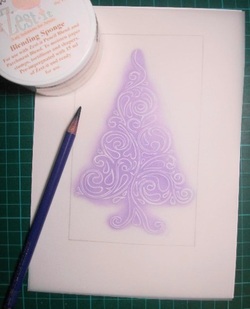
Add colour on the back using blendable pencils and a blending medium, I am using Zest it oil.
Video below shows you how to colour parchment paper using blendable pencils and Zest it, you can also use 'White Spirit'
Video below shows you how to colour parchment paper using blendable pencils and Zest it, you can also use 'White Spirit'
)
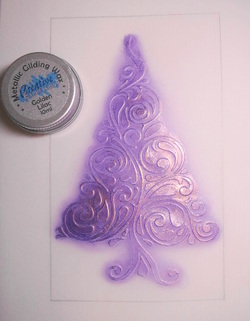
Add gilding wax 'Golden Lilac' onto the front of the swirly tree.
Be careful only to add small amounts each time and build up the layers of wax.
Polish in between each layer.
Be careful only to add small amounts each time and build up the layers of wax.
Polish in between each layer.

Add an embossed border using the swirly tree stencil.
Make a mark in the centres of each pencil border line.
Start your border at these centre marks.
Emboss the corners shapes.
Emboss all border sections that are left to fill.
Make a mark in the centres of each pencil border line.
Start your border at these centre marks.
Emboss the corners shapes.
Emboss all border sections that are left to fill.
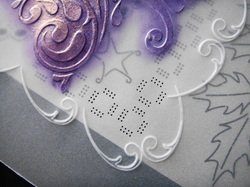
Perforate the inside corner sections using the Siesta Star & Holly Grid
Emboss stars randomly around the tree using the Siesta Star & Holly Grid
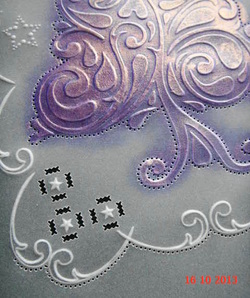
Cut out the corner perforations into slots as shown.
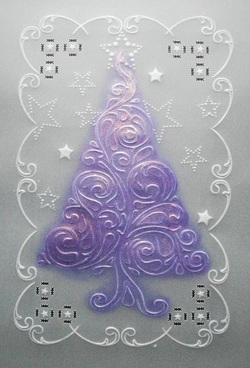
Perforate around the outer edges of the embossed border using a Pergamano 2 Needle Tool
Cut around the outer border perforations using parchment craft scissors.
Video below shows the parchment craft cutting technique.
Perforate around the outer edges of the embossed border using a Pergamano 2 Needle Tool
Cut around the outer border perforations using parchment craft scissors.
Video below shows the parchment craft cutting technique.
)
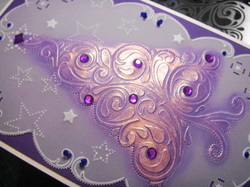
I have attached the parchment to purple card by stitching through the parchment and card using a sewing needle, purple cotton and small purple beads.
I have also added some self adhesive crystal gems to the tree.
Video below shows how to attach parchment to a background card using a 'Sewing Technique.
I have also added some self adhesive crystal gems to the tree.
Video below shows how to attach parchment to a background card using a 'Sewing Technique.
)
