
Parchment Craft Magazine August 2014
Step by Step Tutorial - Pattern can be found in the
Parchment Craft Magazine August 2014 issue.
Parchment Craft Magazine August 2014 issue.

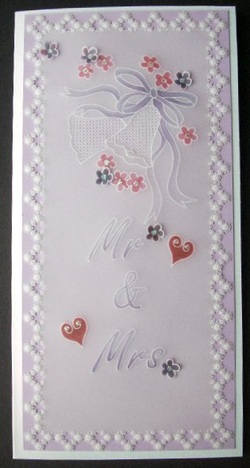
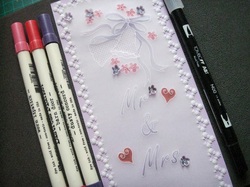
A simple but pretty parchment craft design that can be used for a wedding or anniversary card.
A delicate lace border surrounds a design of bells with flowing ribbons and tiny flowers some of which are 3 dimensional.
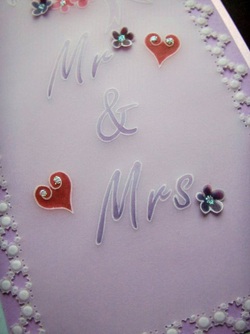
The Mr & Mrs can be omitted and you can add another greeting of your choice.
Step by step instructions can be found below, I hope you find them useful.
A delicate lace border surrounds a design of bells with flowing ribbons and tiny flowers some of which are 3 dimensional.
The Mr & Mrs can be omitted and you can add another greeting of your choice.
Step by step instructions can be found below, I hope you find them useful.
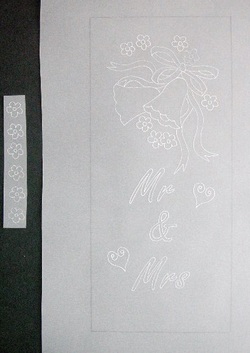
This picture shows the pencil traced outline and the rest of the design traced in white ink.
Try to achieve very fine lines with your mapping pen and ink.
Trace a few flowers on a separate piece, these will be your 3D flowers.
Try to achieve very fine lines with your mapping pen and ink.
Trace a few flowers on a separate piece, these will be your 3D flowers.
Secure your main parchment piece onto a Pergamano Grid 29 right side up, carefully aligning the pencil lines with the holes on the grid.
Following the grid pattern given in the Parchment Craft Magazine start in the bottom right hand corner and continue until you have a perforated lace patterned border. Remove form the grid
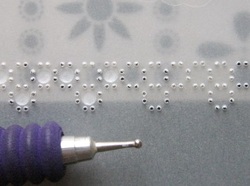
Emboss on the back dots inside the lace work as shown in the picture, you can do this do this free hand or cheat and use a pre patterned grid (I used the Siesta Tulip Grid) as this as holes that fit very neatly into the lace work, but you can use any grid you have for this, by using a grid in this way your embossed dots will be very neat and evenly sized.
Following the grid pattern given in the Parchment Craft Magazine start in the bottom right hand corner and continue until you have a perforated lace patterned border. Remove form the grid
Emboss on the back dots inside the lace work as shown in the picture, you can do this do this free hand or cheat and use a pre patterned grid (I used the Siesta Tulip Grid) as this as holes that fit very neatly into the lace work, but you can use any grid you have for this, by using a grid in this way your embossed dots will be very neat and evenly sized.
This picture shows how neat the dots look from the front when you (Cheat) and use a grid.
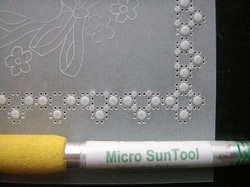
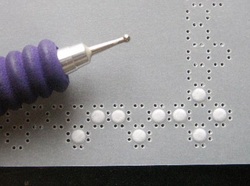
Emboss the other smaller sections inside the lace border using a PCA Micro Sun Tool.
Be careful not to press to hard with this tool as you are likely to go through your parchment.
Be careful not to press to hard with this tool as you are likely to go through your parchment.
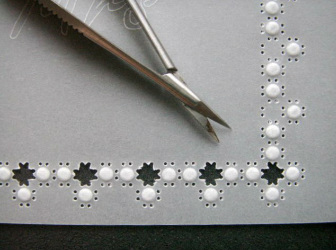
Cutting the lace border.
Start with the inside lace sections as shown.
Imagine you are standing inside the section you are cutting out.
Cut the 4 pairs of holes first and then cut the 4 diagonal holes.
Cutting the diagonals can be a bit tricky as the holes are further apart so take your time.
Start with the inside lace sections as shown.
Imagine you are standing inside the section you are cutting out.
Cut the 4 pairs of holes first and then cut the 4 diagonal holes.
Cutting the diagonals can be a bit tricky as the holes are further apart so take your time.
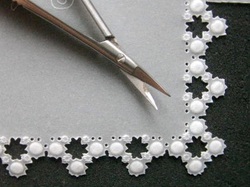
Cut around the outer perforations
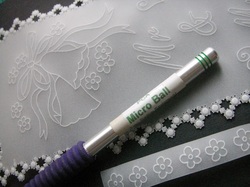
Emboss all of the white traced lines from the back using a PCA Micro Ball Tool
Add colour to the ribbons, flowers (Including 3D ones), hearts and words using a water based marker pen and blender pen, I used the Distress Pens.
Apply the colour on the back direct from the pen, apply the colour in what you think the shaded areas will be.
Using the blender pen (if you don't have one of these you can use a damp round paint brush)
Drag the colour into the other areas this gives a graduation of colour from a deep shade to a paler shade.
The colours I used were Dusty Concord for ribbons and words, Worn Lipstick for the main flowers, Dusty Concord for the 3D flowers and Barn Door for the hearts.
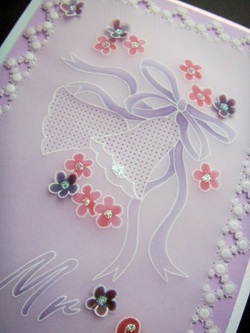
This picture shows the graduation of colour, adding colour way makes it very soft and subtle.
For a finishing touch add sparkle using a Quickie Glue Pen and fine crystal glitter.
Attach your design onto a piece of card using a sewing technique following some of the inside perforations in the lace border.
I would love to see your version of this design please post a picture to my face book page or your own page and tag me in it or the Parchment Craft Magazine face book page, links below.
Wendy's Face book page
Parchment Craft Magazine face book page.
 RSS Feed
