
This PAL can be printed out in a PDF version.
Please scroll down to the bottom of the page and click on the 'Print Friendly' button.
Please scroll down to the bottom of the page and click on the 'Print Friendly' button.
Part 6: Grid Work and Finishing
Posted Monday June 1st
Tools required for Part 6:
Pergamano Grid 28
Embossing & Perforating mats
Small Ball Tool
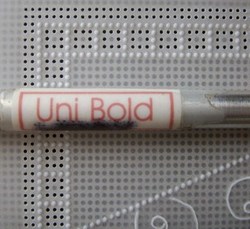
Single Needle Perforating tool (Bold Gauge)
Parchment Craft Scissors
Pergamano Grid 28
Embossing & Perforating mats
Small Ball Tool
Single Needle Perforating tool (Bold Gauge)
Parchment Craft Scissors
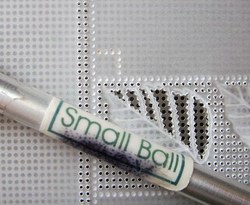
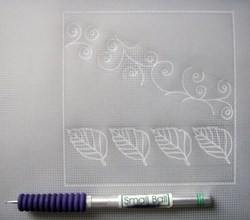
Lay your grid onto an embossing mat.
Secure your parchment right side down on your grid carefully aligning your embossed dots.
Using a small ball tool start to emboss the grid pattern as shown
Secure your parchment right side down on your grid carefully aligning your embossed dots.
Using a small ball tool start to emboss the grid pattern as shown
The pattern is 5 dot boxes joined together, leaving 9 holes in the centre of each box as shown.
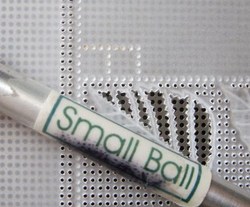
Rather than doing each bow individually you can emboss rows of dots as shown.

Then go back to the beginning and add the boxes as shown.
You can make any design of dot patterns the choice is yours.
I have decided to keep it simple for this lesson.
I have decided to keep it simple for this lesson.

I have repeated the pattern in the above section of the design.
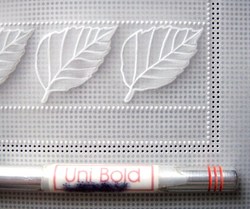
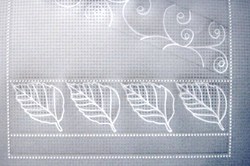
Now to perforate inside the boxes.
Remove your parchment from the grid.
Secure back on the top of the grid right side up, carefully aligning the embossed dots.
Place a perforating mat under your grid.
Using a Bold Gauge Single Needle Tool perforate inside the boxes as shown.
Remove your parchment from the grid.
Secure back on the top of the grid right side up, carefully aligning the embossed dots.
Place a perforating mat under your grid.
Using a Bold Gauge Single Needle Tool perforate inside the boxes as shown.
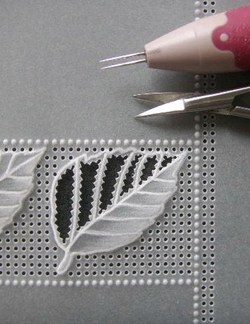
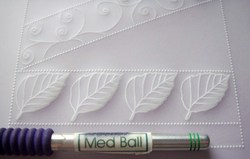
Cutting out the lace section.
Using parchment craft scissors cut the parchment in-between the holes until the inside section falls out as shown.
Using parchment craft scissors cut the parchment in-between the holes until the inside section falls out as shown.
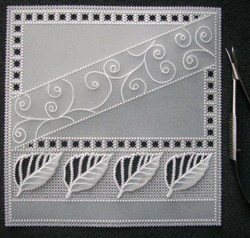
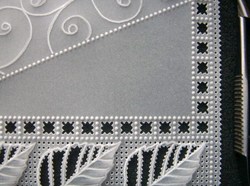
Cut around the outer border holes and remove the excess parchment.
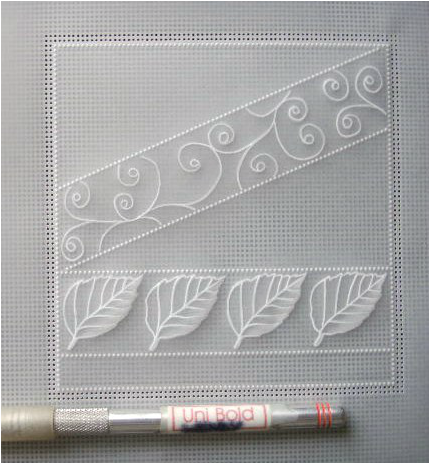
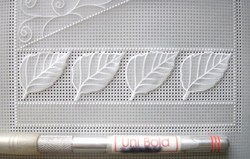
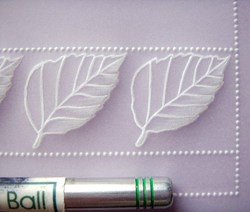
Your design is complete.
You can add colour to the diagonal section and behind the leaves using blendable pencils or water based pens or leave as this delicate white work.
I hope you have enjoyed this tutorial. I am looking forward to seeing your completed designs. :-)
Your design is complete.
You can add colour to the diagonal section and behind the leaves using blendable pencils or water based pens or leave as this delicate white work.
I hope you have enjoyed this tutorial. I am looking forward to seeing your completed designs. :-)
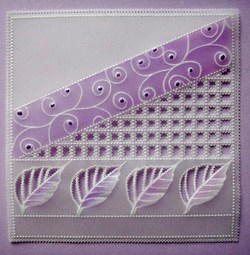
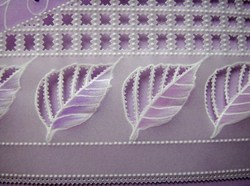
Here is a picture of my original design with added colour and a different variation of grid work.
The purple dots in the swirls is a Sakura Metallic Gel Pen, when dry I embossed the dots from the back.
The purple dots in the swirls is a Sakura Metallic Gel Pen, when dry I embossed the dots from the back.
Part 5: Leaf Vein Perforating
Posted Monday May 25th
Tools required for part 5
Perforating mat
Pergamano 2 needle tool
Parchment Craft Scissors
Perforating mat
Pergamano 2 needle tool
Parchment Craft Scissors
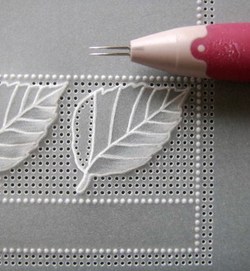
This part is optional, perforating inside the leaf veins.
Perforating inside small areas requires a steady hand also lots of patience.
Place your design on a perforating mat right side up.
Using a Pergamano 2 Needle tool, perforate around the inside of the leaf veins as shown.
TIP: Keep the tool as upright as possible this will make neat round holes, perfect for easy cutting.
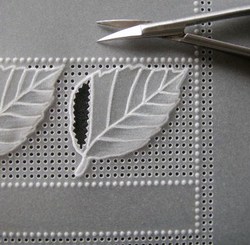
Carefully cut the small piece of parchment between the holes using parchment craft scissors.
TIP: Always cut so the traced line is above your scissors.
Following these rules you will need to turn the parchment around as you cut.
Using this cutting technique you will achieve a neat 'Picot' edge, this is the tiny 'V's.
TIP: Always cut so the traced line is above your scissors.
Following these rules you will need to turn the parchment around as you cut.
Using this cutting technique you will achieve a neat 'Picot' edge, this is the tiny 'V's.
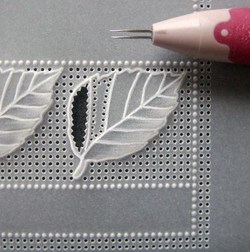
Continue perforating the next section being careful.
Cut out the next section as shown.
I think perforating and cutting each section this way helps you to see the lace pattern as it builds.
I think perforating and cutting each section this way helps you to see the lace pattern as it builds.
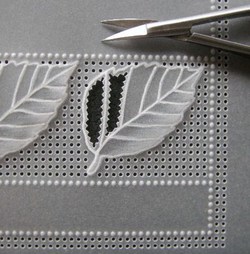
This is what it should look like when its finished.
Doing this kind of lace work can be time consuming but as you can see well worth the effort.
I am looking forward to seeing your lacy leaves :-)
Doing this kind of lace work can be time consuming but as you can see well worth the effort.
I am looking forward to seeing your lacy leaves :-)
Part 4: Perforating
Posted Sunday May 17th
Tools & Equipment you will need for part 4
Pergamano Grid 28 or similar
Bold Gauge Single Needle Tool (I used a PCA Uni Bold Tool)
Perforating Mat
Pergamano Grid 28 or similar
Bold Gauge Single Needle Tool (I used a PCA Uni Bold Tool)
Perforating Mat
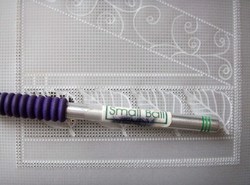
Secure your parchment right side up onto a Pergamano Grid 28
Carefully aligning your border embossed dots with the holes on the grid.
Perforate a double row of holes around the outside of the embossed border dots, as shown.
Carefully aligning your border embossed dots with the holes on the grid.
Perforate a double row of holes around the outside of the embossed border dots, as shown.
Here is a closer picture of the border perforations.
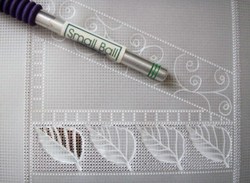
Keeping the parchment on the grid, perforate every hole around the leaves as shown, this is an alternative way of creating a very simple lace effect.
See picture below for a more intricate lace effect.
See picture below for a more intricate lace effect.
If you like this more intricate lace look inside the leaves, do not do the every hole perforations around the leaves, as described in the last part.
Tool required for this technique is a Pergamano 2 Needle Tool, perforate inside the traced line and in-between the leaf veins and cut out using parchment craft scissors.
Tool required for this technique is a Pergamano 2 Needle Tool, perforate inside the traced line and in-between the leaf veins and cut out using parchment craft scissors.
This concludes part 4, next week we will be creating a lace work pattern inside the design.
Part 3: Tracing & Embossing your pattern
Posted Saturday May 9th
Tools & Materials you will need for Part 3:
Ruler & Graphite Pencil
White gel Pen
Small & Medium Embossing Ball Tools & Embossing Mat
Pergamano Grid 28
Ruler & Graphite Pencil
White gel Pen
Small & Medium Embossing Ball Tools & Embossing Mat
Pergamano Grid 28
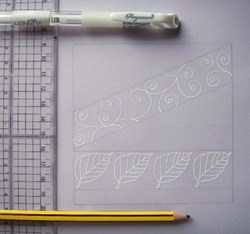
Secure a piece of parchment over your pattern.
Trace with graphite pencil & ruler:
Outer border, Double lines at the bottom & diagonal lines.
Trace with white gel pen:
Swirls lines & Leaves
TIP: When tracing the leaves only trace the outline and the veins as shown.
Trace with graphite pencil & ruler:
Outer border, Double lines at the bottom & diagonal lines.
Trace with white gel pen:
Swirls lines & Leaves
TIP: When tracing the leaves only trace the outline and the veins as shown.

Here is a closer view of the traced leaves.
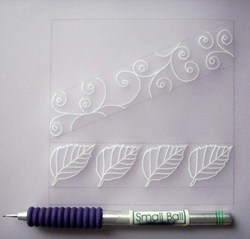
Remove your parchment from your pattern.
Place your parchment right side down on an embossing mat.
Wipe over the back of your parchment with a tumble drier sheet.
Emboss the 'White' traced lines of the swirl and leaves using a small ball tool.
Place your parchment right side down on an embossing mat.
Wipe over the back of your parchment with a tumble drier sheet.
Emboss the 'White' traced lines of the swirl and leaves using a small ball tool.
Here is a closer view of the embossed lines.
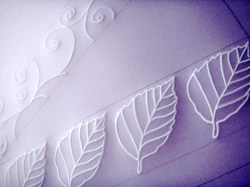
Grid Embossing:
Secure your parchment right side down onto a Pergamano Grid 28 using a low tack tape, carefully aligning the pencil lines of the border.
Place your work onto an embossing mat.
Using a Small Ball embossing tool, emboss a single row of dots around the outer border.
Secure your parchment right side down onto a Pergamano Grid 28 using a low tack tape, carefully aligning the pencil lines of the border.
Place your work onto an embossing mat.
Using a Small Ball embossing tool, emboss a single row of dots around the outer border.

Here is a closer picture.
Next emboss the lines above and below the leaves as shown.

Next remove your parchment from the grid and re align with the diagonal lines either side of the swirls.
Emboss a single row of dots as shown.
At this stage you can erase the pencil lines.
Emboss a single row of dots as shown.
At this stage you can erase the pencil lines.
Emboss leaf detail in only one half of the leaves, using a Medium Ball embossing tool.
Working from the back using a 'Graduated Embossing' Technique
Working from the back using a 'Graduated Embossing' Technique
Here is a closer picture.
This concludes part 3, watch this space for part 4 next weekend.
Part 2: Creating pattern images using stamps
Posted Sunday May 3rd
List of materials you will need for part 2:
Dreams Garden Leaf Stamp Set
Black ink pad.
Dreams Garden Leaf Stamp Set
Black ink pad.
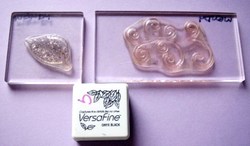
I have attached the small leaf and swirl stamps from my Dreams Garden Leaf Stamp Set onto clear blocks.
NOTE: If you don't have my stamps you can use any stamps you already have, it will make it interesting when you post your finished cards :-)
You will need any black ink pad as we are stamping onto our paper template which we drew out in last weeks tutorial, which you can find if you scroll down this page.
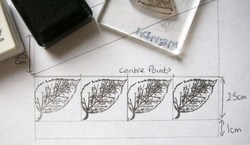
Start by inking up your leaf stamp.
Stamp a leaf into each of the 4 spaces on the bottom of your template.
You can stamp them all the same way as shown or in a different variation.
Stamp a leaf into each of the 4 spaces on the bottom of your template.
You can stamp them all the same way as shown or in a different variation.
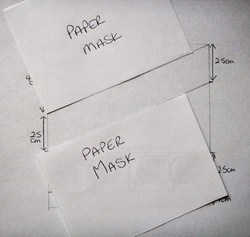
Now to stamp inbetween the diagonal lines.
First make 2 paper masks, using these either side of the diagonal lines so we don't stamp outside of them.
Ink up the swirl stamp and stamp inside the diagonal lines, you will need to move the paper masks along if you have made them to small like I have :-)
First make 2 paper masks, using these either side of the diagonal lines so we don't stamp outside of them.
Ink up the swirl stamp and stamp inside the diagonal lines, you will need to move the paper masks along if you have made them to small like I have :-)
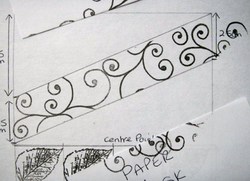
You will make a more interesting pattern if you turn your stamp each time you stamp it.
The picture on the left shows you the completed swirl pattern.
The picture on the left shows you the completed swirl pattern.
In Part 3 we will be tracing your pattern creation onto parchment craft paper.
Part 1: Making a pattern template
Starts Sunday April 26th
Here is a list of materials you will need for part 1.
White copier paper 80gsm
Basic Card Template Set
Graphite Pencil
Ruler
White copier paper 80gsm
Basic Card Template Set
Graphite Pencil
Ruler
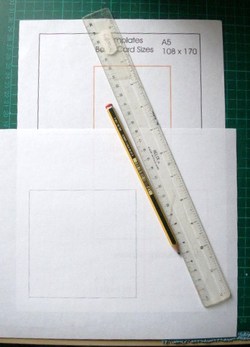
Step 1:
Once you have printed out your basic card templates, you will need the sheet with the square 6" x 6".
Place a piece of copier paper over the top and trace the border lines using a graphite pencil and ruler.
If you trace it centrally you will have room either side to make notes.
Remove from the template.
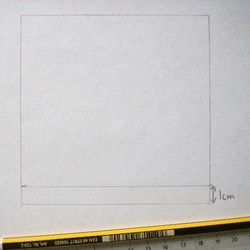
Step 2:
From the bottom line measure up 1 cm and mark either side.
Connect the marks by drawing a line as shown.
From the bottom line measure up 1 cm and mark either side.
Connect the marks by drawing a line as shown.
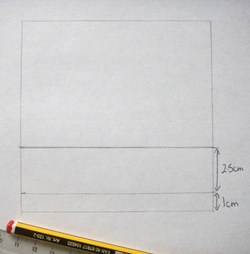
Step 3:
Place another mark at 2.5cm up from your first mark.
Do this both sides and connect with a line.
Place another mark at 2.5cm up from your first mark.
Do this both sides and connect with a line.
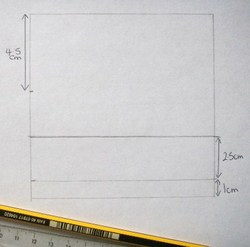
Step 4:
Moving down from the top left hand corner place a mark at 4.5cm, do not repeat on other side.
Moving down from the top left hand corner place a mark at 4.5cm, do not repeat on other side.
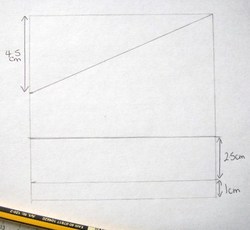
Step 5:
Draw a diagonal line from the 4.5cm mark up to the top right hand corner as shown.
Draw a diagonal line from the 4.5cm mark up to the top right hand corner as shown.
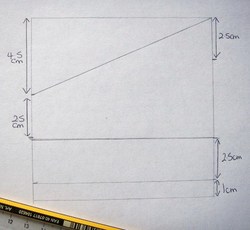
Step 6:
Moving down from the top right corner place a mark at 2.5cm.
Moving down from the top right corner place a mark at 2.5cm.
Step 7:
Place a mark moving down from the 4.5cm mark on the left hand side, draw a diagonal line across to the 2.5cm mark on the right hand side.
Place a mark moving down from the 4.5cm mark on the left hand side, draw a diagonal line across to the 2.5cm mark on the right hand side.
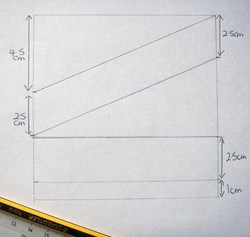
Step 8:
Mark the centre points between the double lines at the bottom.
Mark the centre points between the double lines at the bottom.
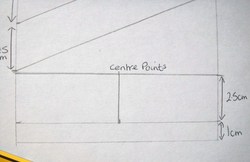
Step 9:
Draw a line to connect.
Draw a line to connect.
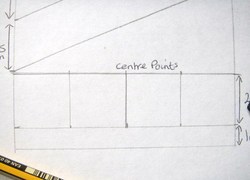
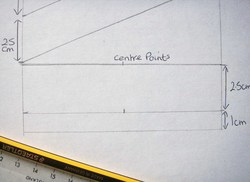
Step 10:
Mark the centres of the two halves and connect the marks as shown.
This completes your stamping template.
I will be using the large leaf and swirl stamp from my Dreams Garden Leaf Set but you can use similar stamps that you may already have.
NOTE: If using other stamps your template sizing may need to be adjusted as these measure fit my stamp sizes.

