
Suitable for a beginner/intermediate.
FREE Lesson - Graduated Embossing Technique
By Wendy Walters 2014


In this lesson I will show you how to emboss flower petals using a 'Graduated Embossing Style' but it is also known as shading or feathering. . This style shows the light and shaded areas within a specific image or shape.I personally think this style of embossing looks very pretty and delicate, if done correctly can make images look realistic.
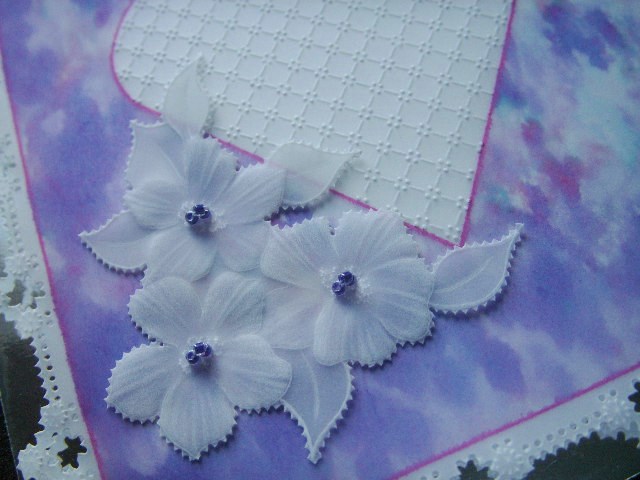
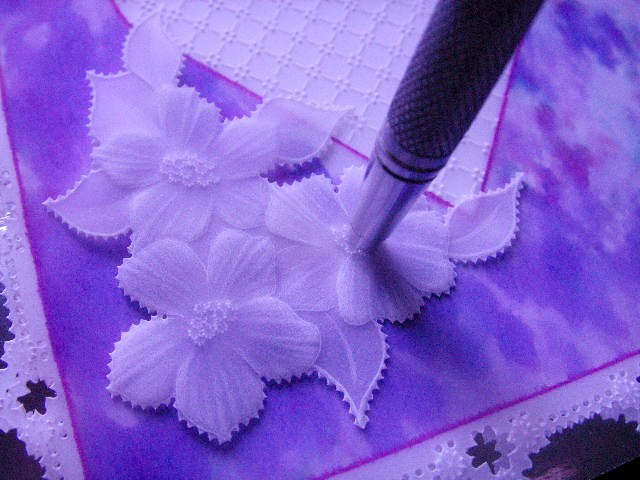
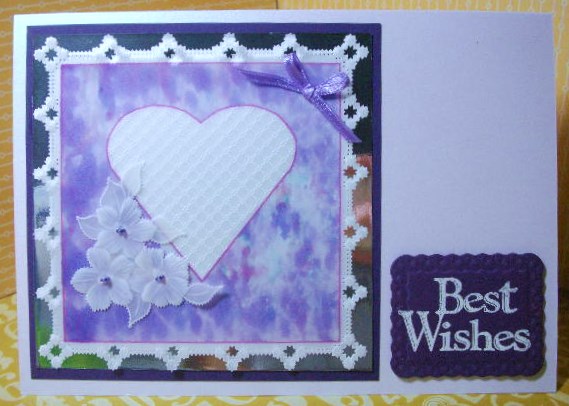
Here is a close up picture of the 3 flowers attached to a card background.
The 'Splash of Colour' Aperture Heart background can be downloaded from the link below.
Simply print direct onto a sheet of 140gsm parchment craft paper and allow to dry flat for at least 5 mins before using.
The 'Splash of Colour' Aperture Heart background can be downloaded from the link below.
Simply print direct onto a sheet of 140gsm parchment craft paper and allow to dry flat for at least 5 mins before using.
| free_splash_of_colour_-_aperture_heart.pdf |
The FREE Pattern - 3 Flower Embellishment can be downloaded by clicking on the link below:
| free_pattern_-_3_flower_embellishment_by_wendy_walters.pdf |
Tools & Equipment you will need:
- Parchment craft paper
- Mapping Pen & White ink
- Embossing Mat
- PCA Micro Ball Tool
- PCA Scriber Tool
- PCA Large Ball Tool
- PCA Medium Ball Tool
- PCA Small Ball Tool
- Pergamano 2 Needle Perforating Tool
- Perforating Mat
- PCA Micro Sun Tool
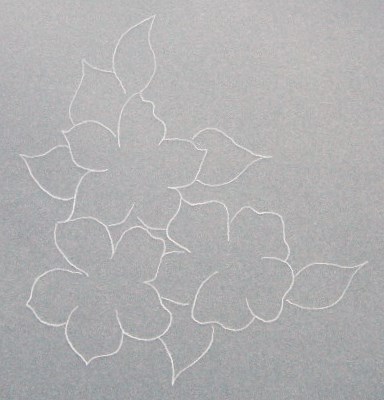
Secure the parchment over the pattern.
Trace the pattern image using a Pergamano Mapping Pen & Tinta White Ink.
Video Tutorial on Tracing using this technique click link below:
http://geminiclasses.weebly.com/tracing---mapping-pen--white-ink.html
Trace the pattern image using a Pergamano Mapping Pen & Tinta White Ink.
Video Tutorial on Tracing using this technique click link below:
http://geminiclasses.weebly.com/tracing---mapping-pen--white-ink.html
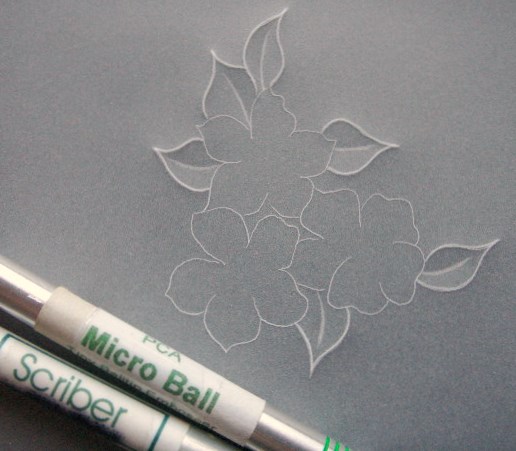
Emboss the outer leaf lines using a PCA Micro Ball Tool.
Emboss the leaf veins with a PCA Scriber Tool (from the front) this will shape the leaves to look more real.
TIP: When using the scriber tool be careful not to press on hard otherwise you will tear your paper.
Emboss the leaf veins with a PCA Scriber Tool (from the front) this will shape the leaves to look more real.
TIP: When using the scriber tool be careful not to press on hard otherwise you will tear your paper.
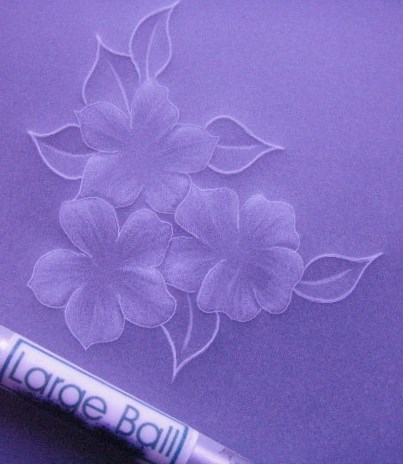
Emboss the petals in a ‘Graduated Style’ using the PCA Large Ball tool for the first of 3 layers of embossing.
The first layer is worked very softly in the direction of the natural growth of the petals, start from the outer edge and flicking inward toward the centre.
Where the petals overlap leave a small gap unembossed to give the impression of a shadow. Don’t emboss all the way into the centre.
TIP:You can always add more embossing but you cannot take it away.
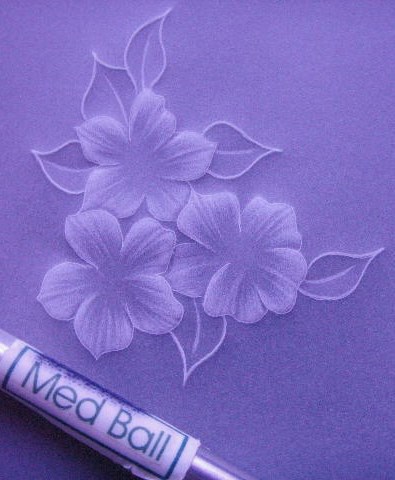
The second layer of embossing is worked with the PCA Medium Ball
Working directly over your first layer to increase the whiteness and create more definition.
At this stage the traced outlines should be disappearing into your embossing, if not you maybe embossing short of the traced line or your traced lines are too thick!
TIP: Do not over work the embossing at this stage, gradually build up the depth and look at your work at regular intervals and remember to emboss with an even pressure.
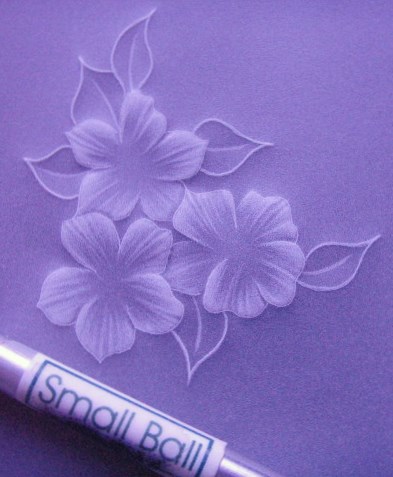
The third and final embossing layer using a PCA Small Ball Tool.
Work directly over the previous embossed layers.
Concentrate on achieving crisp white edges to the petals and eliminating the traced lines.
Create highlights to the individual petals. Especially to the edges of the one’s that overlap.
Work directly over the previous embossed layers.
Concentrate on achieving crisp white edges to the petals and eliminating the traced lines.
Create highlights to the individual petals. Especially to the edges of the one’s that overlap.
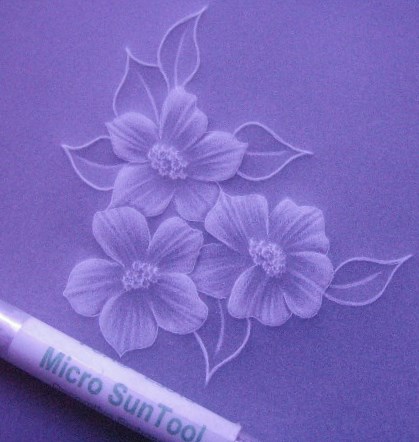
Add a centre focal point to your flower centres with a PCA Micro Sun Tool.

Perforate around the edges of your embossed flowers (From the front) using a Pergamano 2 Needle Perforating Tool.
NOTE: Place your work on a perforating mat
A 2 needle tool is one of the basic tools you will use again and again.
Hold the tool as upright as possible; this will achieve nice round holes.
NOTE: if you use this tool at an angle you will get oval shaped holes, when you come to cut them it will affect the finished look.
Perforate your first 2 holes to the outside edge of your flowers; it doesn't matter where you start.
Move the tool left or right depending this will depend if you are right or left handed the technique is the same, drop your last needle in one of your first perforations and perforate again, you are only perforating new one hole at a time, the 2 needle tool leaves just the right amount of space to be able to cut.
NOTE: The neatness of your cutting will depend on the neatness of your perforating.
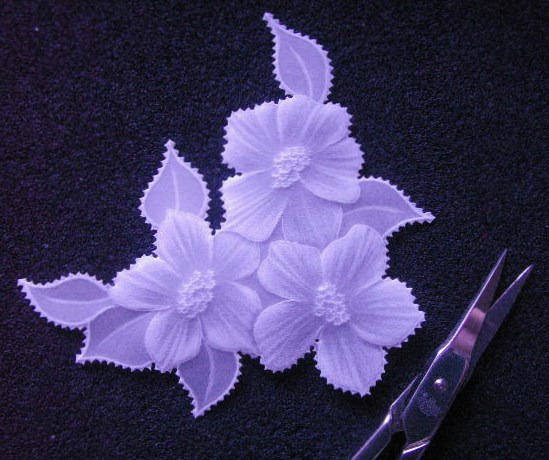
Cutting the flowers out using parchment craft scissors.
TIP: When cutting make sure your scissors are over the excess parchment (the area that will fall away), you will achieve a neater finish and a lovely ‘Picot’ lace edge.
Click here to see a video tutorial on Perforating & Cutting
TIP: When cutting make sure your scissors are over the excess parchment (the area that will fall away), you will achieve a neater finish and a lovely ‘Picot’ lace edge.
Click here to see a video tutorial on Perforating & Cutting
The pictures show the completed parchment flower embellishment attached to a card using a sewing technique and small beads.
I hope you have enjoyed this lesson on if you have any questions please do not hesitate to ask.
Click here - Video Tutorial on How to attach parchment using a 'Sewing Method'
I hope you have enjoyed this lesson on if you have any questions please do not hesitate to ask.
Click here - Video Tutorial on How to attach parchment using a 'Sewing Method'

The centre of the heart was embossed using the Pergamano Grid 20 and the border lace design is 4 Petal Flower
 RSS Feed
